
When Carolyn invited me to contribute an article on EAV for the Newsletter I was both honoured and at a complete loss as to where to start. The subject is so vast! Perhaps the best place to start is at the beginning with taking measurements.
In order to give good treatment, a good diagnosis is necessary. We can all use the MORA to give symptomatic treatment but is this what the patient wants? Many of my patients know that they do not feel well but conventional medicine has been unable to find anything wrong. Standard blood tests, etc. all prove to be normal. This leaves the patient frustrated so they turn to complementary therapy for help. In most cases it becomes possible to find out exactly what is causing their illness. This results not only in a good treatment plan but also with a very relieved and satisfied patient.
EAV is a wonderful and precise diagnostic tool. If we learn to ask the right question then the body will provide the answer but first we have to master the art of measurement. Over the years I have run many master classes. What has disturbed me is that the majority of students are unable to obtain a reproducible measurement from a point. Many practitioners claim that EAV is subjective and that reproducibility is not possible. It was in Russia that I was challenged to demonstrate that this was indeed possible. The set up was simple. I was to take about ten point measurements with the sound turned off from the measuring device and the measurement dial turned away from me. There was no feedback at all. An observer would write down the measurement values and then I was to re-measure the same points under the same conditions. Would they be even close to the original measurements? Happily all measurements were within plus or minus two scale divisions of the original – well within experimental error! This is the standard of measurement to which we should all aim.
The major problem facing all beginners in electro-diagnosis is that of obtaining correct and reproducible measurement values. There are two difficulties which must be overcome:
- exact point location
- obtaining correct measurement pressure
Point location has been dealt with elsewhere [See OIRF EAV Desk Reference Manual, Part I] so let us now consider how to obtain the correct pressure.
When taking measurements we are not taking a simple skin resistance value. We are attempting to measure the electrical activity of an energy centre (an acupuncture point) several mm below the surface of the skin. This electrical activity is measured via the surface of the skin and therefore the nature of the skin over the measurement point must be taken into consideration. Moist skin needs less pressure than dry skin. Rough, calloused skin will require considerably more pressure than delicate skin. The skin of children requires less pressure than that of adult patients.
Rule 1
The pressure required varies according to the skin condition in the vicinity of the point being measured.
Cuts, scratches, inflammations etc. will make measurements at that point impossible.
Since the measurement point lies below the surface of the skin it is necessary to overcome the physical barrier to the electrical interchange presented by the skin.
Rule 2
The initial pressure is somewhat greater than that needed for subsequent measurements.
The measurement tip is placed exactly on the measurement point. The pressure is then immediately and swiftly increased. No hesitation must occur when increasing the pressure. At the same time the pressure increase must not be too abrupt, i.e. do not jab or jerk.
If the pressure increase is too slow, low measurement values will occur. If too sudden, the momentum of the indicator needle will carry it past the correct value. In addition, trauma may also occur at the measurement point.
Watch the indicator needle. It will rise quickly at first and then slow down just before the maximum value. It is important to learn to observe the movement of the measurement dial rather than to look at the point being measured. Many beginners find this difficult and the tendency is to want to look at the probe rather than the measurement dial. Do place the measuring instrument in direct line of sight with the hand or foot of the patient so that both can be observed simultaneously.
When the needle begins to slow down, gently reduce the speed of the pressure increase. Do not reduce the pressure, merely the increase in pressure, i.e. try to match the speed of the pressure increase with the speed of the indicator needle.
The indicator will remain stable at a particular value even when pressure is gently increased somewhat further. Do not jab the probe at this stage, otherwise you will exceed the measurement plateau (see graph of measurement plateau).
When the correct pressure is obtained maintain that pressure and wait to see if an indicator drop occurs (the indicator drop will usually start within three seconds. Do not be in too much of a hurry to remove the probe). If there is no I.D. then note the maximum value obtained. If an I.D. does occur, then hold the pressure constant until the needle had subsided to its minimum value. In cases of a prolonged and slow I.D. this may take over a minute.
From the above description, it will be seen that it is vitally important to watch the indicator needle throughout the measurement process. To do this one must be confident of point location and that the angle of the probe has been correctly set. Much practice is necessary before correct measurements can be obtained.
The first essential is accurate point location. Let us start with the “nail points”, i.e. those points lying close to the corner of the nail bed on the hands and feet. These are sometimes referred to as terminal points or “ting” points and are the points that are taught first because they are the easiest to master. The easiest way to find the approximate location is to mark datum lines on the skin of the subject.
Locating the Terminal Points.
Because these points are the easiest to locate and the easiest to measure you should concentrate first on accurately locating and measuring the nail points before going on to try to locate and measure other more difficult points. I would like to emphasise that time spent on mastering fundamental skills is time well spent.
The first group of points to be mastered are those on the hands. Do not go on to the foot points until you have become proficient and confident with the points of the hands. Although in principle the foot points are no more difficult than the hand points, because the toes are much small than the fingers precise point location is more difficult. The little toe can present many difficulties for beginners!
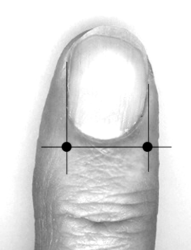
Figure 1, Nail points showing datum lines.
- Place the hand flat with the palm down and locate the nail bed. This is not the base of the actual nail (i.e., the cuticle) but approx. 2mm proximal to the nail. Draw a horizontal line across the base of the nail bed, extending to both sides of the nail. (see fig 1.)
- Now, draw a second line from the widest part of the nail to cross the first line at right angles. The nail point lies approximately at this point of intersection.
- Using a water based marker or pen place a small dot on the point of intersection. Repeat on both sides of the nail for the thumb and all fingers of the hand. (You are strongly advised to mark the location of all points before attempting to measure.)
Taking the Measurement
- When all terminal points have been marked out, place the hand electrode into the hand that is not being measured.
- Using light pressure, gently slide the measurement probe over the vicinity of the point. Take care to watch the dial of the measuring instrument whilst doing this. The needle of the dial will rise to approximately 20 scale units when directly over the point. (Light pressure is sufficient to just indent the skin but is not as strong as the measurement pressure.)
- With the measurement probe lightly indent the skin at this point. (Do not use excessive pressure. It is helpful to mark a small dot on the centre of the point for future reference if you need to come back and re-measure the point.)
- Take the probe off the point and then gently lay it on the point at a slightly oblique angle pointing towards the body.
- Now rotate the probe to right angles to the point maintaining a steady pressure. This should be sufficient to obtain a correct measurement value. Do not jab the point! (You can check that a correct value has been obtained by gently and gradually increasing the pressure applied to the probe. When you are on the measurement plateau the measurement value should not increase until a considerable pressure is applied.
- Note or record the measurement value obtained and then go on to measure the remaining terminal points of the hand. When you have done this, go back and re-measure all points. You should aim to be within plus or minus two points of the original value.
Many students, being uncertain that they have obtained a good measurement, will wish to take several measurements from the same point. This temptation should be avoided because of the possibility of traumatizing the point. Slipping on the point, or excessive pressure can damage the skin making further measurements unreliable. This is the reason why I advise that you take a measurement from each nail point before attempting to re-measure. If the point has been accurately located and the probe technique is good then excessive pressure is not required. A simple rotation of the probe with steady pressure is all that is required. Of course, practical teaching from an expert is the best way to learn because the teacher can check your technique and advise accordingly.
Constant practice is the only way to master measurement technique. One should aim to take at least five sets of measurement data each day until fluency has been obtained. When confident with the terminal points of the hands then one should attempt the toes. The little toe can present many problems especially on the outer edge. Very often the skin will be hard or calloused. If this is the case then omit that measurement for the time being. When a fair degree of expertise has been obtained then it will be possible to approach the point from a different angle in order to obtain a measurement.
Common Faults
If an accurate measurement is to be obtained it is important that one watches the measurement dial. Therefore, it is important to place the hand (or foot) in such a position that you can watch both the probe and the measurement dial at the same time. Most beginners are so involved in trying to obtain an accurate location and pressure that they forget to watch the movement of the needle on the measurement dial.
It is also very important to rest the hand or foot being measured on a firm surface. It is impossible to obtain a good and reproducible measurement with the hand held in the air!
The third common fault is insufficient pressure. Points can be tender to the patient and students are often reluctant to apply sufficient pressure because of fear of causing pain. If the energy at the point is stagnant then the point will often be spontaneously tender and a certain amount of discomfort will be experienced by the patient. This cannot be helped. An inaccurate measurement is of no use. However, if a good technique is developed then excessive pressure should not be necessary. Once the probe is on the point with light pressure then the measurement will probably be at around 20. All that is then required is a slight rotation of the probe to a vertical position to obtain a correct measurement.
Occasionally the student will try to apply excessive pressure, especially if the skin is dry. A small amount of moisture on the probe tip should solve this problem.
Jabbing or thrusting at the point is also a common fault. Although the speed at which pressure is applied is important, one should refrain from jabbing into the point. Equally, one should not be excessively slow in applying pressure. A smooth fluent motion is correct.
If you have followed these descriptions carefully and conscientiously then you should, with some practice, be able to obtain accurate and reproducible measurements from the terminal points. Once this skill has been mastered then the remaining points on the hands and feet should not present any undue difficulty.
 An Exclusive Article for Members
From THE BRIDGE Newsletter of OIRF
Published September, 2008
© Copyright 2008, Dr. Tony Scott-Morley, UK
Our sincere thanks go out to Dr. Tony for his great contribution to this Issue.
Please follow this link for Part 2 of this article entitled: “Patterns of Measurement”
[See also the OIRF Medication Testing Report based on the work of Dr. Fritz Kramer.]

")
